
Tutorial: MIT Thesis LaTeX Template with VS Code
Published:
Let’s set up the MIT thesis LaTeX template locally!

Generated by GPT-4o. Prompt: A playful illustration showing a happy MIT student proudly holding a printed MIT thesis in one hand and a laptop showing VS Code with LaTeX code in the other. In the background, icons representing LaTeX, PDF documents, and MIT’s iconic Great Dome subtly float around. The student stands triumphantly on top of a stack of neatly bound theses. The style is colorful, lighthearted, and cartoonish.
MIT’s libraries require theses to be deposited electronically using a strict format. To simplify formatting, the MIT thesis LaTeX template provides a class (mitthesis.cls) and a set of sample files that implement these requirements.
Many thanks to Prof. John H. Lienhard for maintaining mitthesis and for generously answering questions from students like me.
Update September 2026: this post now targets mitthesis v1.24, dated August 21, 2026. If you read an earlier version, the one thing worth knowing is that \LGO is now an official, documented command, so the temporary workarounds this post used to describe are no longer needed. Any other screenshots or comments you remember came from the v1.20-v1.23 period, when class-file location, committee-page behavior, and LGO cover-page workarounds were all still moving.
This tutorial blog builds on top of my previous “Tutorial: Use LaTeX Locally with VS Code”. By following that tutorial, you should already have:
- Visual Studio Code with LaTeX Workshop installed. The extension provides core LaTeX features such as auto‑building to PDF, an integrated PDF viewer, SyncTeX navigation, IntelliSense, and log parsing. It automatically runs the sequence of tools needed to build your document and highlights errors in the editor.
- TeX Live 2022 or newer. The MIT thesis class requires a recent LaTeX distribution; CTAN lists v1.24 as requiring TeX Live 2022 or later. A full TeX Live installation includes
lualatex,pdflatex, biber and other programs needed by the template. I recommend LuaLaTeX for the current template, especially if you care about modern PDF metadata or accessibility workflows. - Biber for bibliography management. The template defaults to using biblatex with the biber backend. Biber is part of TeX Live and will run automatically if configured in LaTeX Workshop.
1. Acquire the template
Download it here: https://mirrors.ctan.org/macros/latex/contrib/mitthesis.zip.
Comprehensive TeX Archive Network (CTAN) is a network of websites that serve as the central repository for TeX-related materials and software; it’s legit and referenced by the official MIT thesis LaTeX template website.
Extract (i.e., “unzip”) the archive to a convenient location—ideally the folder where you plan to write your thesis.
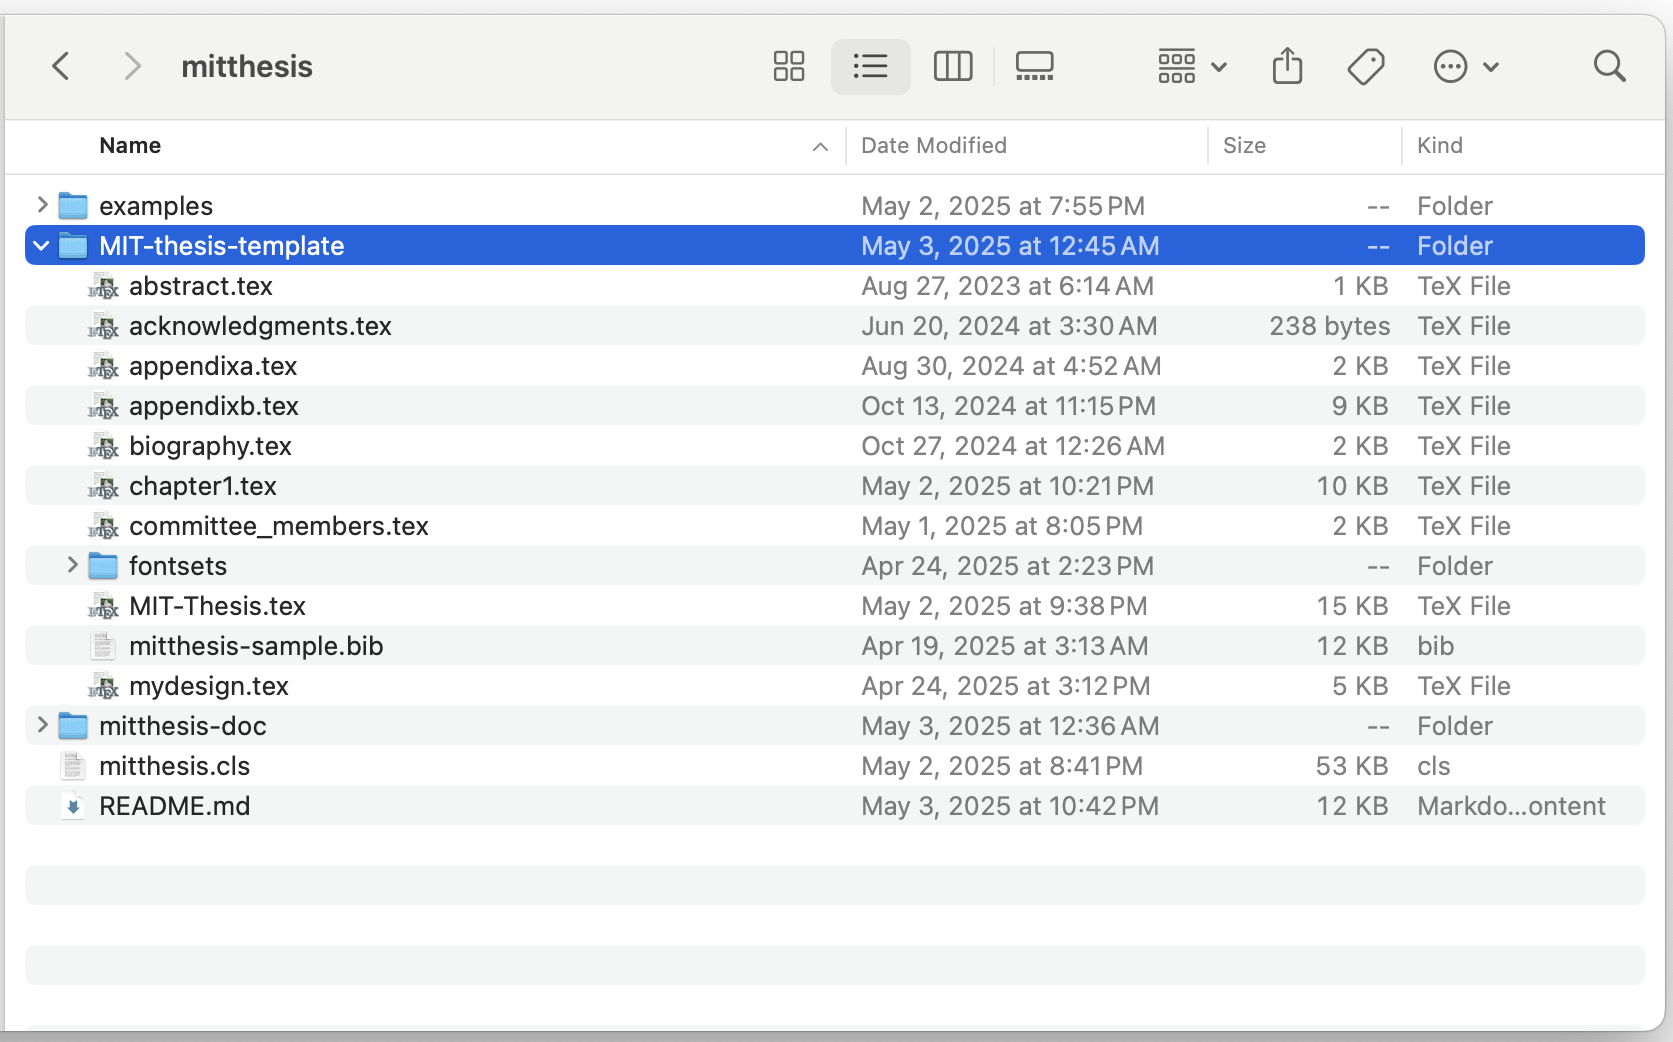
Understand the contents
It’s always recommended to read the included README.md. This file lists the archive contents, notably a class file and a MIT-thesis-template folder containing everything you need to start writing:
| File/Folder | Purpose |
|---|---|
mitthesis.cls | Core LaTeX class implementing MIT formatting |
MIT-thesis-template/MIT-Thesis.tex | Main LaTeX file for your thesis |
abstract.tex, acknowledgments.tex, biosketch.tex | Files where you insert your abstract, acknowledgments and optional biographical sketch |
chapter1.tex, chapter... | Sample chapters to use as templates |
\Reader{...} commands / committee_members.tex | In v1.21 and newer, \Reader{...} commands automatically generate the thesis committee page; if you omit all readers, you can still insert your own optional committee_members.tex page before the abstract |
appendixa.tex, appendixb.tex | Sample appendices showing code listing and long tables |
mitthesis-sample.bib | Sample bibliography file with many entries |
mitthesis-style.css | Optional CSS embedded when tagged PDF is in use |
mydesign.tex | Optional file where you can load packages to customise colours, margins or caption styles |
fontsets/ | Subdirectory containing optional font definitions |
Additionally, the mitthesis-doc directory contains detailed PDF documentation, and the examples directory provides sample theses showcasing different font options.
After extraction, keep the directory structure intact; LaTeX will look for chapter files relative to the main file. You can rename the outer folder to reflect your project’s name.
Class file location update
Update September 2026: the current mitthesis package listing shows mitthesis v1.24 dated August 21, 2026. The archive still puts mitthesis.cls in the outer mitthesis folder, while MIT-thesis-template is the folder with the files you edit. The official documentation says to copy MIT-thesis-template onto your system; if the current mitthesis.cls is already installed in TeX Live, you are all set, and if not, copy mitthesis.cls into your working directory.
In practice, with VS Code + LaTeX Workshop, the least surprising setup is:
- Open
MIT-thesis-templateas the VS Code workspace. - Copy
../mitthesis.clsintoMIT-thesis-templateif your local TeX Live has an older installed class. - Rebuild.
This matters because TeX Live may already resolve \documentclass{mitthesis} to an older installed mitthesis.cls. For example, a TeX Live 2025 installation can still have mitthesis v1.20 while the current CTAN zip is v1.24. Mixing template files and class files from different versions can trigger confusing errors; Undefined control sequence \CiteNolink is one example. Copying the outer class file into MIT-thesis-template makes the project use the class version that came with the files you just downloaded.
2. Opening the project in VS Code
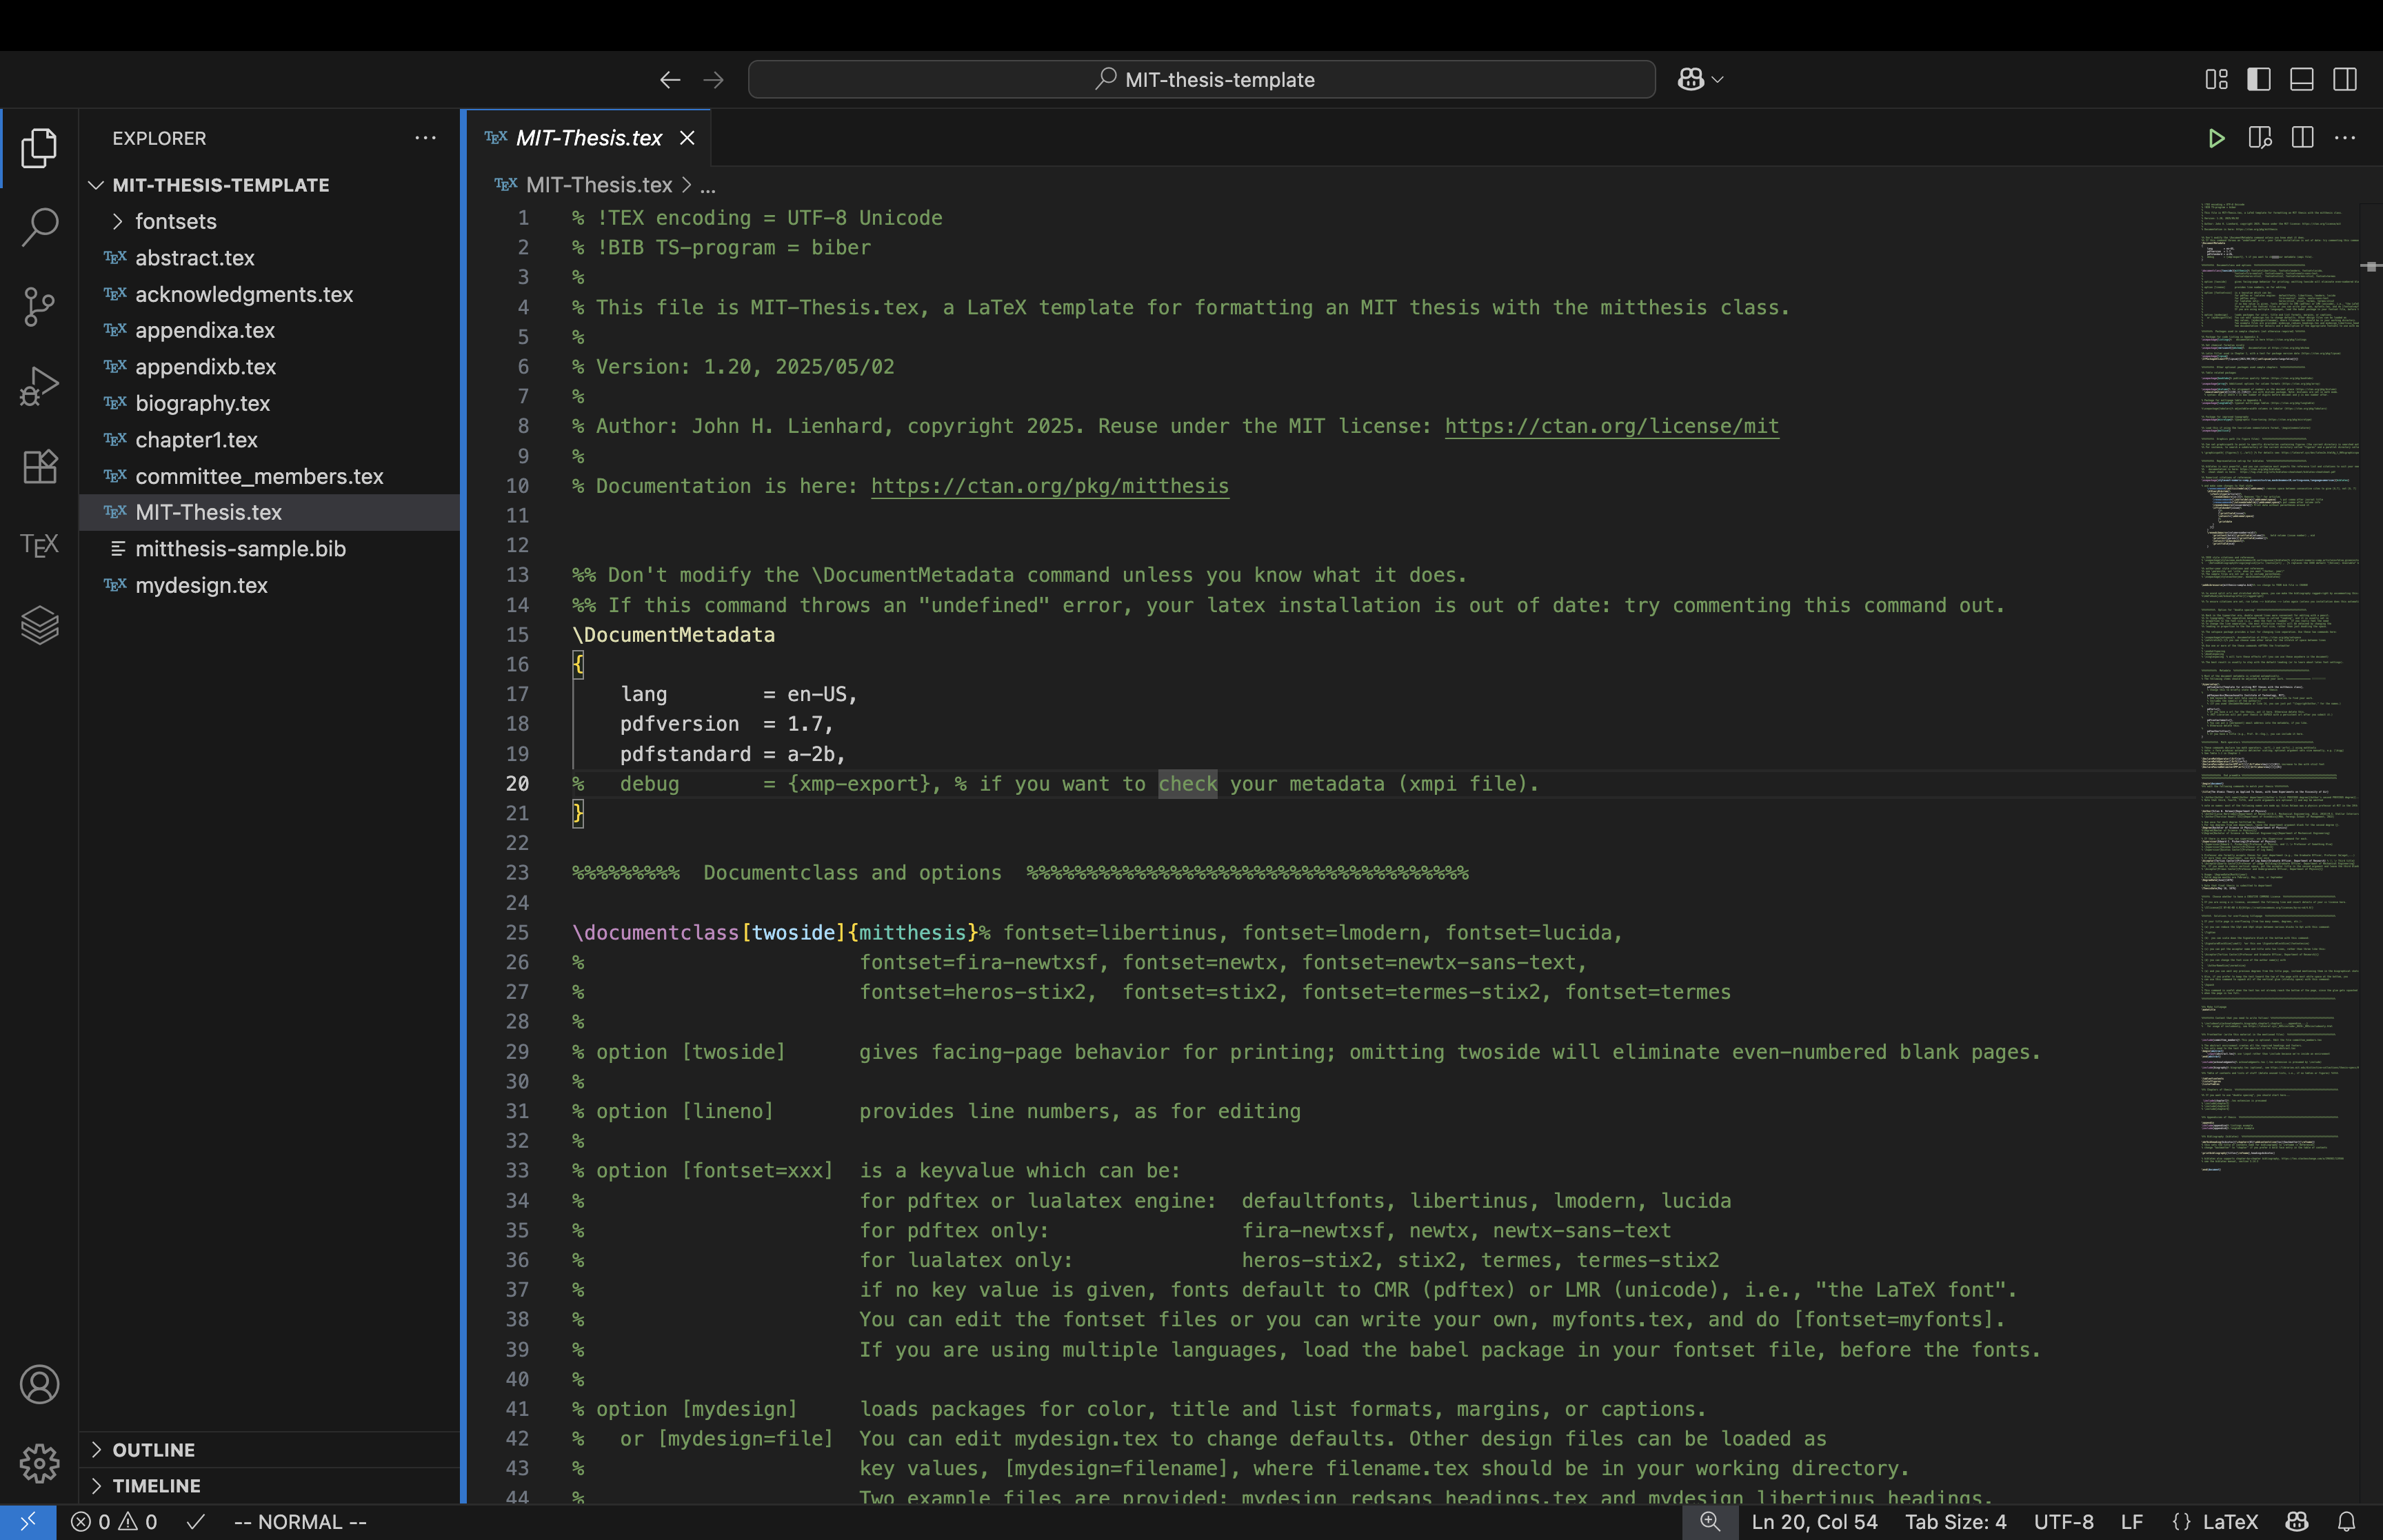
Launch VS Code, then choose File → Open Folder… and select the MIT-thesis-template folder (not the outer mitthesis folder!).
VS Code will treat this folder as the workspace.
Open the MIT-Thesis.tex file as it is the root document.
3. Trigger the build
You should see a “TEX” badge from the LaTeX Workshop extension appearing in the leftmost panel of your window.
Trigger a file save using standard shortcuts:
- macOS:
command+S - Windows:
Ctrl+S
As explained in the previous tutorial, saving the file automatically triggers the LaTeX Workshop build process. You’ll notice a spinning “🔄 Build” icon in the bottom-left corner, indicating compilation in progress. This may take a minute.
During compilation, local setup variations can cause errors. If you encounter an issue, please let me know so I can include quick fixes here. I also recommend troubleshooting with your preferred GenAI tool—my go-to choice is GitHub Copilot.
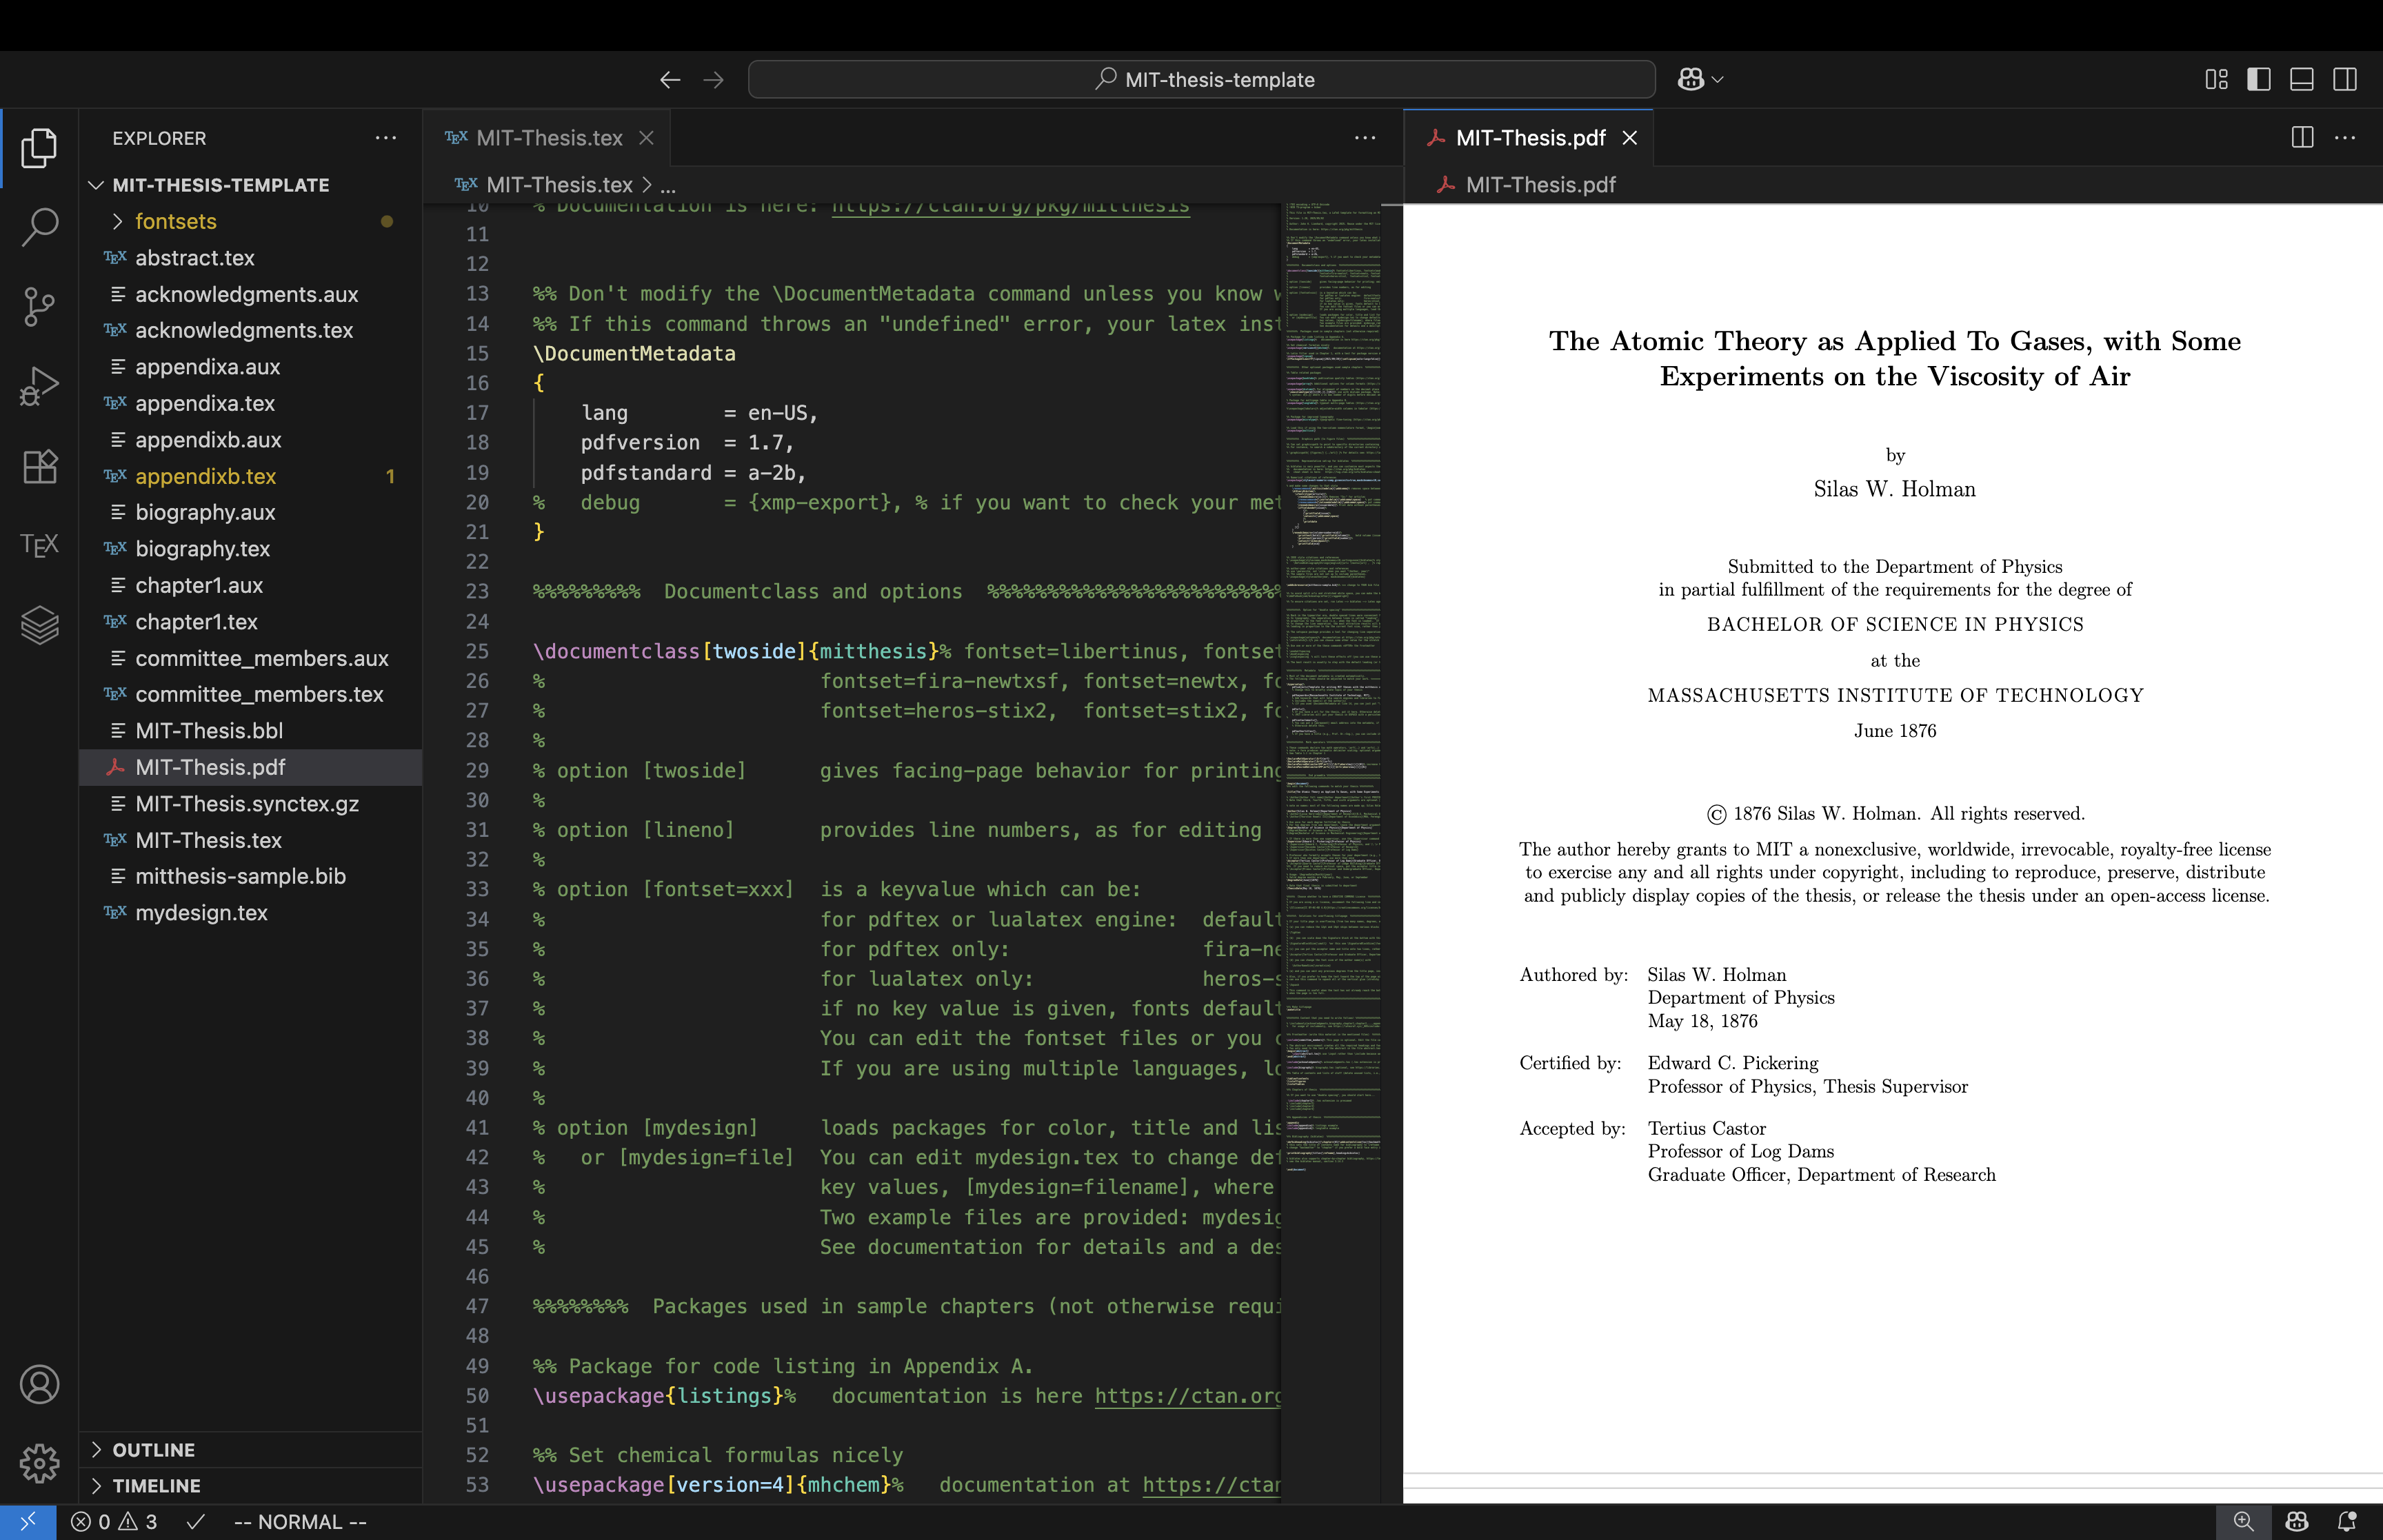
Scroll through the generated PDF file, MIT-Thesis.pdf; it should closely match the official example PDF.
Congratulations, your MIT Thesis LaTeX template is now ready to use.
4. Familiarize yourself with the template
The best way to get comfortable is to explore its structure – no shortcuts here.
Please read the official documentation – again, no shortcut.
One quick tip: skim through MIT-Thesis.tex. Notice the multiple \input{} statements pulling in separate files for different thesis sections, such as abstract.tex and chapter1.tex. Edit these files slightly, rebuild the PDF, and observe the results – action learning at its finest!
If you are a student in MIT’s Leaders for Global Operations (LGO) dual-degree program, continue to the next section. Otherwise, you’re all set.
5. LGO Thesis tweaks
The official package includes a useful dual-degree example: One_author_two_degrees.tex. The LGO-specific version below follows the current v1.24 interface, where the LGO cover-page line is built in.
Before the mechanics: thank you to Prof. John H. Lienhard for maintaining mitthesis and for the generous email exchange behind this section. It started in May 2026 with a small bug report from me (the sample dual-degree file omitted “May” from its list of valid degree months), which he fixed the same morning, along with pointing me to the cleaner \\ & pattern for multi-department lines. When I asked whether the package might natively support the LGO cover-page phrase, he offered to write a \LGO macro, checked it with MIT Libraries, and kept me posted through every step. He also wrote up the whole modernization effort in TUGboat: “Modernizing MIT’s thesis template: mitthesis.cls”, TUGboat 47(2), 2026, pp. 212-221 (doi:10.47397/tb/47-2/tb146lienhard-mitthesis). It is a good read even if you never touch a class file.
- In your
MIT-Thesis.tex, locate:\begin{document} %%% edit the following commands to match your thesis %%%%%%%%%% - Replace the content from
\title{...}to\ThesisDate{...}(inclusive) with this:\title{Simplify and Accelerate: An Awesome Dual-Degree Thesis Title} % \Author{Author full name}{Author department}[Author's first PREVIOUS degree][Author's second PREVIOUS degree][... % Note that third, fourth, fifth, and sixth arguments are optional [] and may be omitted \Author{LGO Student Name}{MIT Sloan School of Management and \\ & Department of Electrical Engineering and Computer Science}[B.S. Previous Degree, Previous College, 2018] % Use once for each degree fulfilled by thesis % For two degrees from one department, leave the department argument blank for the second degree {}. \Degree{Master of Business Administration}{MIT Sloan School of Management} \Degree{Master of Science in Electrical Engineering and Computer Science}{Department of Electrical Engineering and Computer Science} % If there is more than one supervisor, use the \Supervisor command for each. % The optional [department] field is used on the automatically generated thesis committee page. \Supervisor{Sloan Advisor Name}{Professor of Operations Management}[MIT Sloan School of Management] \Supervisor{Engineering Advisor Name}{Professor of Electrical Engineering and Computer Science}[Department of Electrical Engineering and Computer Science] % Professor who formally accepts theses for your department (e.g., the Graduate Officer, Professor Sméagol,...) % If you need to reduce vertical space, put the acceptor title in the second argument and leave the third blank {}. \Acceptor{Engineering Acceptor Name}{Professor of Electrical Engineering and Computer Science}{Graduate Officer, Department of Electrical Engineering and Computer Science} \Acceptor{Sloan Acceptor Name}{Assistant Dean}{MBA Program, Sloan School of Management} % Keep the signature block at normal size unless the title page itself needs more vertical space. \SignatureBlockSize{\normalsize} \AuthorNameSize{\normalsize} \Tighten % Usage: \DegreeDate{Month}{year} \DegreeDate{May}{2026} % Date that final thesis is submitted to department \ThesisDate{May 8, 2026}
The important part for long department names is the \\ & line break inside the second argument to \Author. The current documentation uses this pattern for multiple departments and titles. An earlier version of this blog (probably referred to by my Class of 2026 classmates) recommended \shortstack[l]{...\\...}; that worked visually, but the \\ & style now matches the template’s own examples better.
Per “Thesis Review and Submission Process”, LGO Handbook (accessed on August 3, 2025), we also need to include:
“IN CONJUNCTION WITH THE LEADERS FOR GLOBAL OPERATIONS PROGRAM AT THE MASSACHUSETTS INSTITUTE OF TECHNOLOGY”.
Good news: the template already includes the command you need. In MIT-Thesis.tex, scroll past the \Reader{...} commands and the Creative Commons block to this banner:
%%%%%%  Special additions to title page  %%%%%%%%%%%%%%%%%%%%%%%%%%%%%%%%%%%%%%%%%%%%%%%%%%%%%%%%

% A few departments or programs ask students to add special text to the title page:

% \LGO % uncomment this command if you are in the Leaders for Global Operations program
% \TitlePageProgramNote{...program's required text...} % use for other programs that require added title page text

% >>> DO NOT use these commands unless your program requires it <<<
Uncomment one line. Delete the % in front of \LGO:
\LGO % uncomment this command if you are in the Leaders for Global Operations program
That is the entire LGO tweak. (The official documentation says to put \LGO “in the preamble”; in the template the line sits after \begin{document}, alongside \title and \ThesisDate. Either works, as long as it comes before \maketitle.)
The official documentation covers this in §7.3, “Adding text to title page when required by your program,” which names LGO as its worked example. If you are in a different program that requires its own line, \TitlePageProgramNote{your text} is the general-purpose version. The documentation attaches a caution worth repeating verbatim:
Do not add text unless your program has approval for the addition from the MIT Libraries; otherwise, your thesis may not be accepted.
LGO has that approval, which is why the command exists.
Using Overleaf instead of a local install? As of September 2026, Prof. Lienhard notes that Overleaf’s template gallery is still on v1.21 (dated November 2, 2025), which does not have \LGO at all, so uncommenting it there fails with Undefined control sequence. Until the gallery catches up, upload the current CTAN mitthesis.cls into your Overleaf project. Overleaf also carries a third-party LGO Thesis Template, described as a slight modification of the MIT one for LGO fellows; it is not Prof. Lienhard’s official package and lags the CTAN version, so check which class file it actually contains before trusting it.
Breadcrumb for my Class of 2026 classmates: earlier versions of this post walked through hand-rolled ways to get the LGO line onto the cover page, back when \LGO was not yet active. If you already submitted using one of them, there is nothing to revisit; your cover page was correct. If you are rebuilding on v1.24, delete any leftover \ExplSyntaxOn block from your preamble, or \LGO gets defined twice and LaTeX will error.
Rebuild your LaTeX project and you should see a cover page like this:
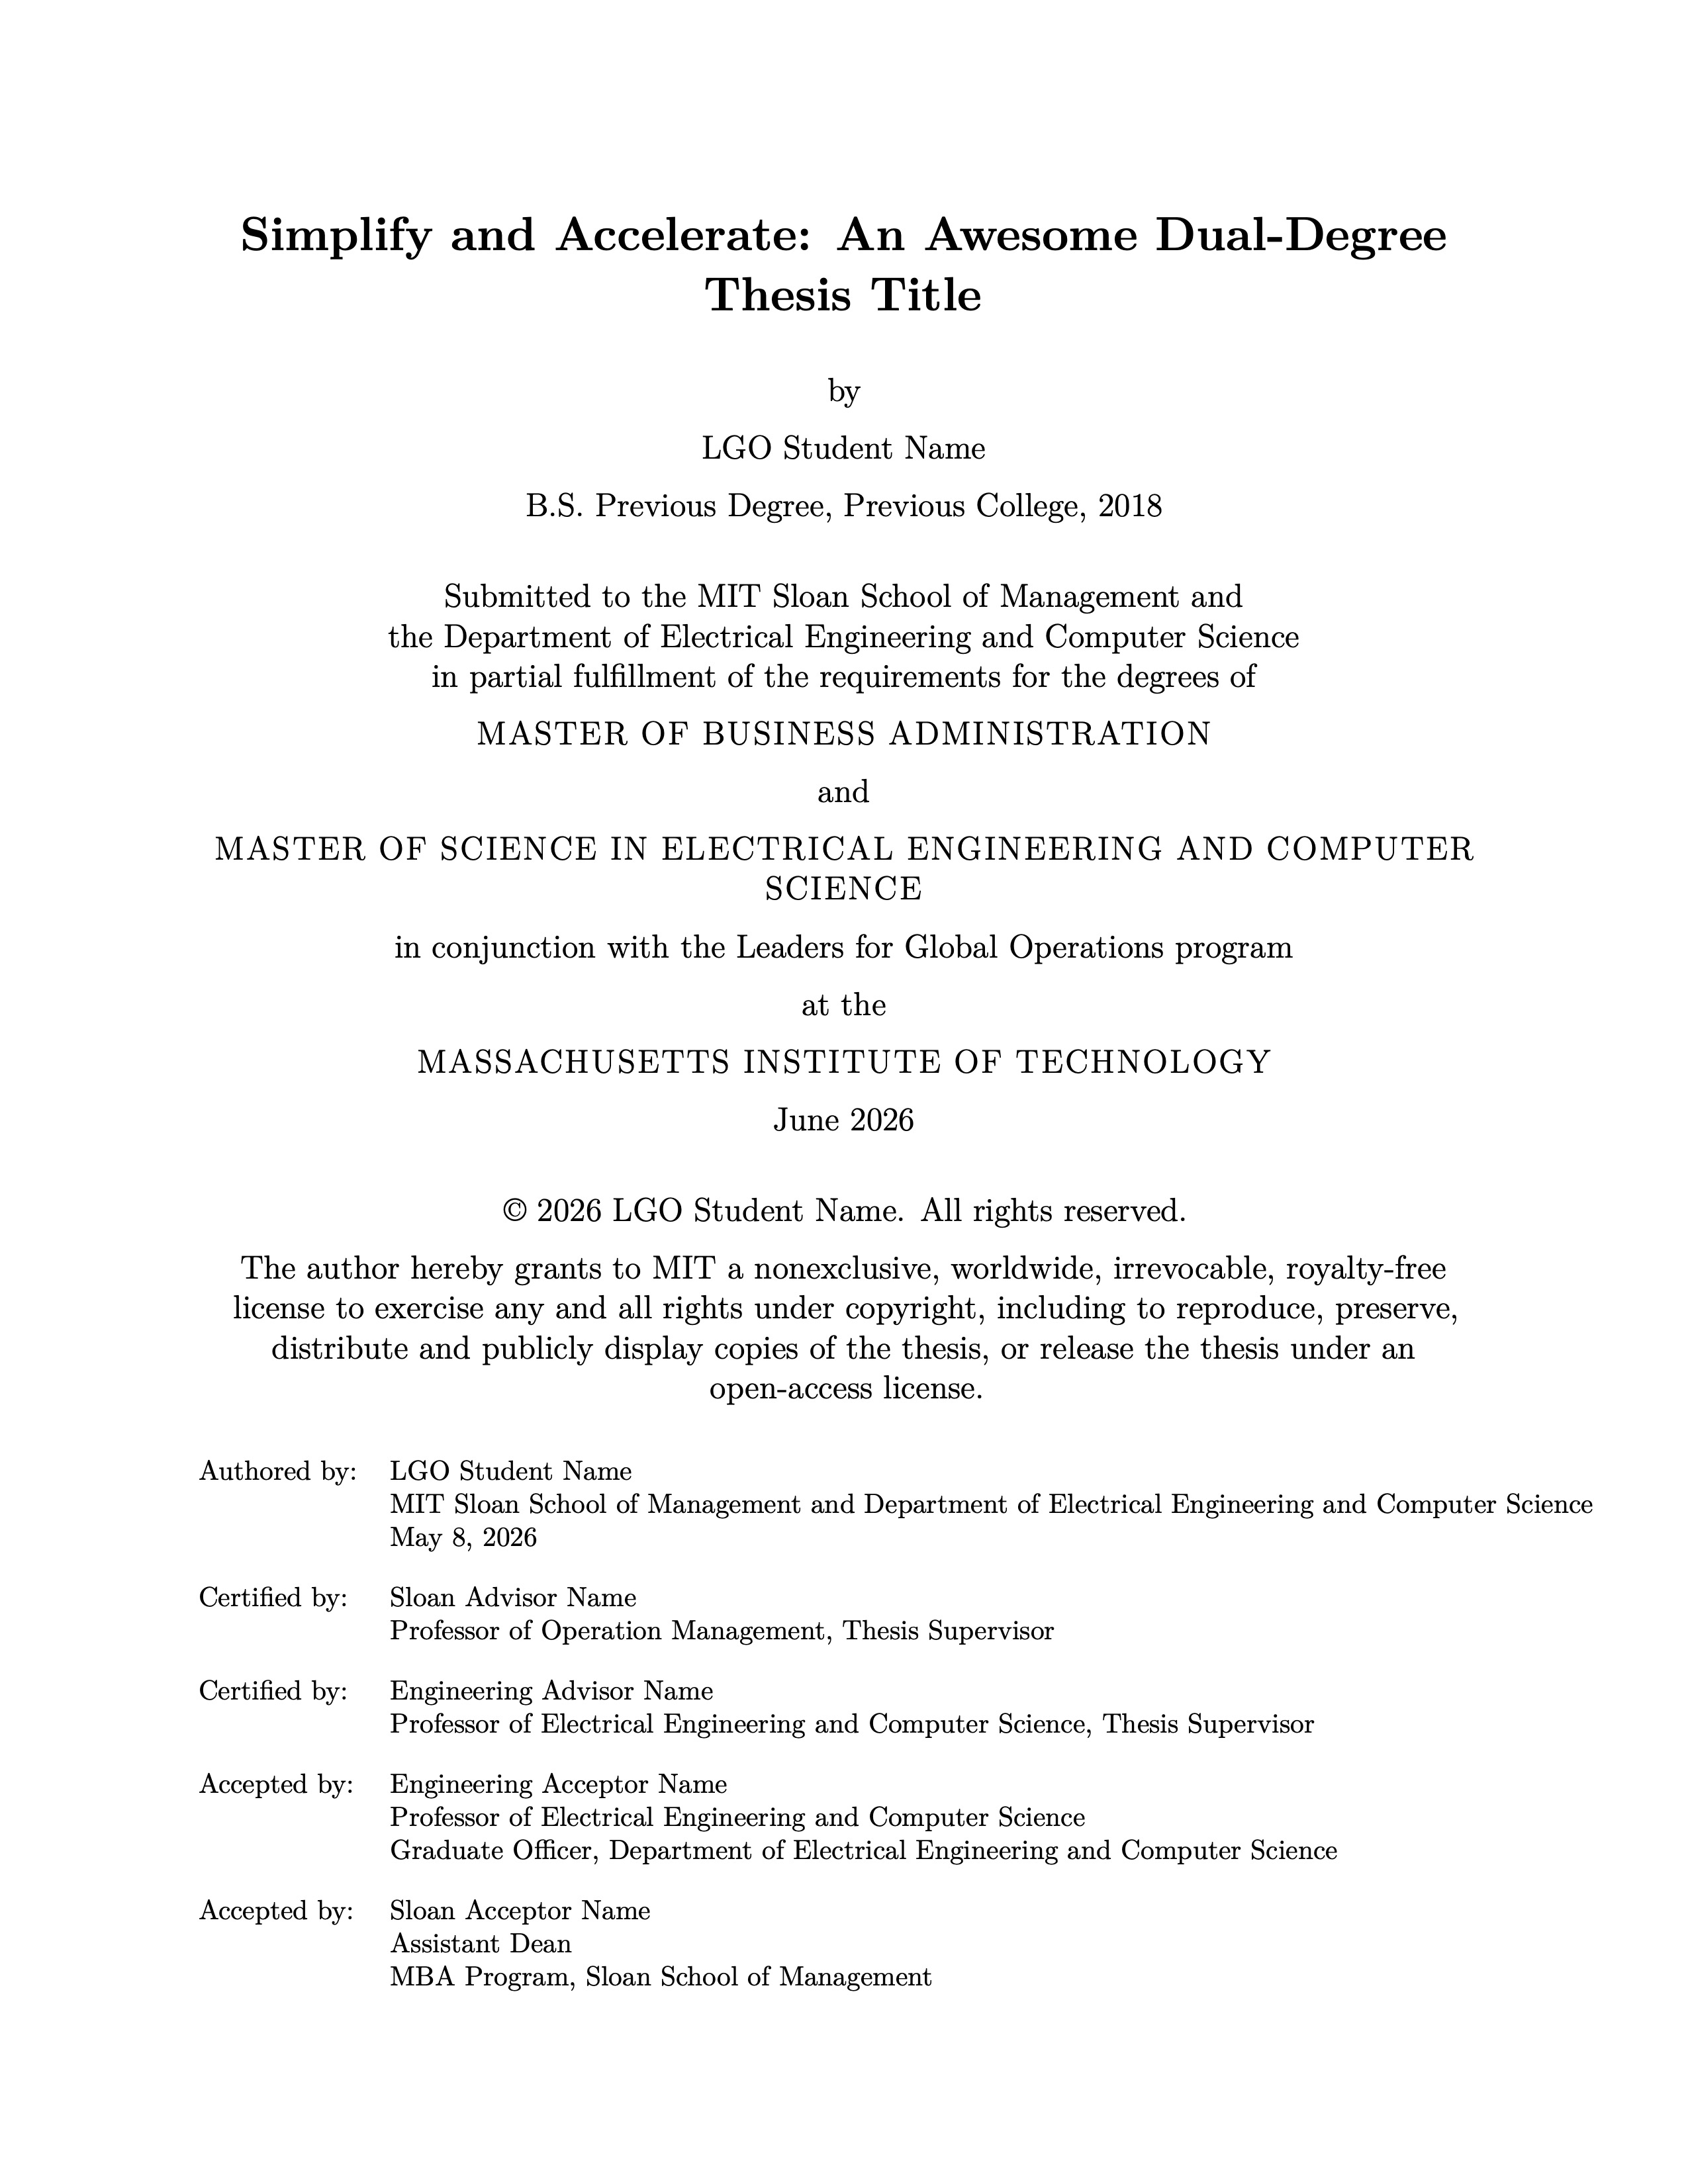
Note that this tutorial uses May 2026 for the LGO Class of 2026 cover page. MIT supports February, May, June, and September as degree months in the template. Requirements do get revised, so confirm your degree date and the rest of the title page with your department and the LGO program office before submitting.
Good luck with your thesis! Good luck to me too…